To organize your cleaning closet for maximum efficiency, start by evaluating and categorizing your supplies into groups like disinfectants and surface cleaners. Use clear bins for easy visibility and label everything for quick identification. Maximize vertical storage by installing over-the-door racks and hooks for mops and brooms. Designate specific areas for different items, keeping frequently used tools at eye level. Regularly check your inventory to prevent duplicates and expired products. Implementing these strategies not only streamlines your space but also simplifies your cleaning routine—stick around to explore more tips on optimizing your organization!
Assess Your Cleaning Supplies
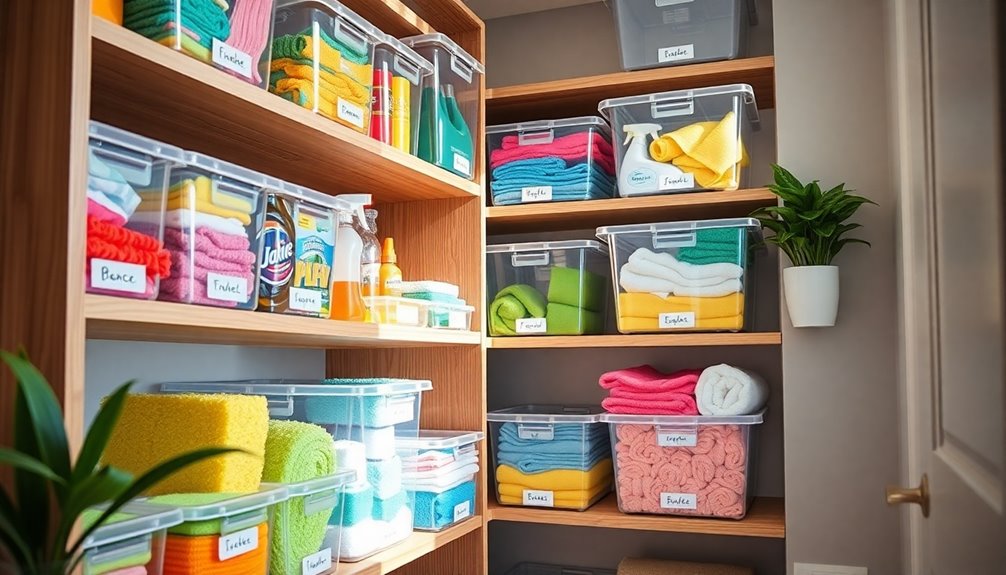
To begin organizing your cleaning closet, first empty it out and assess your cleaning supplies. Group your items into categories like disinfectants, surface cleaners, and laundry products. This process gives you a clear overview of what you have on hand.
Next, conduct a thorough inventory check to identify any expired products or duplicates. Discard or donate these items to reduce clutter and maximize available space. A decluttered space not only enhances accessibility but also makes cleaning more efficient.
Once you've sorted through your supplies, think about how often you use each item. Prioritize the organization of frequently used supplies at eye level for easy access during your cleaning tasks. It makes a big difference when you can grab what you need quickly without rummaging through everything. Consider including non-toxic cleaners in your regularly used supplies, as they are effective and safe for family health.
Use clear bins and labels to store similar products together. This enhances visibility and helps you locate specific items more efficiently. Remember, an organized cleaning closet saves you time and frustration. Additionally, consider using portable caddies for easy transport of your cleaning supplies when tackling different areas of your home.
Finally, make it a habit to regularly update your inventory and reorganize supplies as needed. This guarantees your cleaning routine remains efficient and accommodates any new products you may add over time, creating a space that is both functional and well-planned.
Maximize Vertical Storage
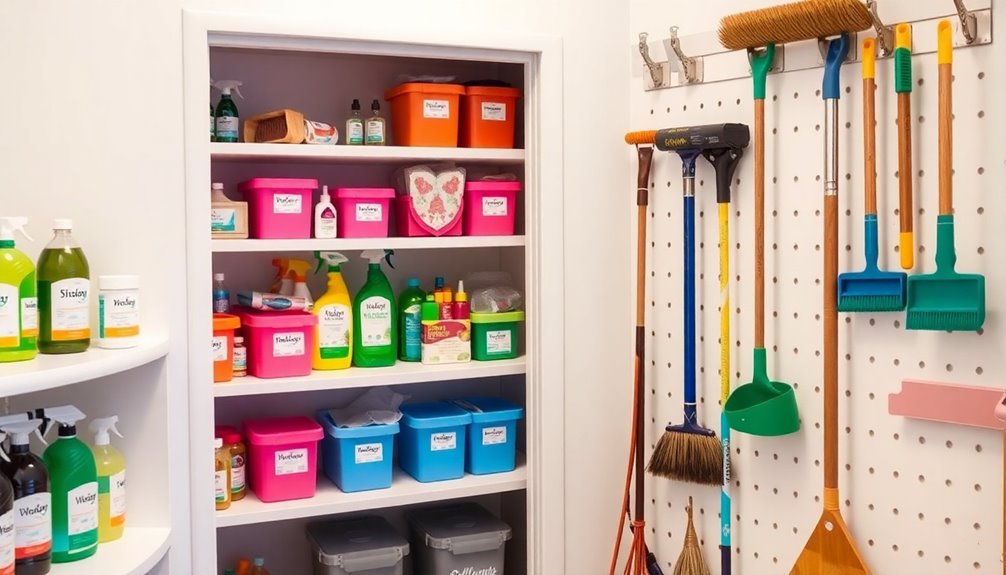
To maximize vertical storage in your cleaning closet, start by utilizing over-the-door solutions for brooms and mops, making the most of that often-unused space. Installing wall-mounted bins can also help you keep your frequently used cleaners easily accessible while freeing up valuable floor space. Additionally, consider using creative shelving systems to further enhance your organization and utilize every inch of available vertical space. Incorporating stackable storage containers can further optimize vertical space, allowing for better organization and easy visibility of contents. This approach not only keeps items organized but also promotes accessibility by frequency of use, ensuring that your most needed supplies are always within reach.
#
Utilize Over-the-Door Solutions
Your cleaning closet can instantly gain more space by incorporating over-the-door solutions that maximize vertical storage. These innovative options, like shoe organizers and racks, allow you to effectively utilize vertical space, providing extra storage for your cleaning supplies without taking up valuable shelf area.
Customizable over-the-door racks are perfect for accommodating various cleaning products and tools, helping you maintain an organized setup in limited closet areas. By hanging items on the back of the door, you can prevent clutter on shelves, making your cleaning closet more streamlined and accessible.
Installing over-the-door storage is easy, and you can rearrange it whenever your cleaning supply needs change. This flexibility means you can always adjust your organization system to fit your latest products.
Additionally, utilizing these solutions can greatly increase your overall storage capacity, keeping frequently used items within easy reach.
Incorporate over-the-door solutions into your cleaning closet, and you'll be amazed at how much more efficient and organized your space becomes. So, go ahead and make the most of that vertical space to create a cleaning closet that works for you!
Install Wall-Mounted Bins
Installing wall-mounted bins in your cleaning closet transforms how you store and access supplies. By utilizing the inside of your closet doors or available wall space, you maximize vertical storage, keeping your cleaning supplies organized and easily accessible.
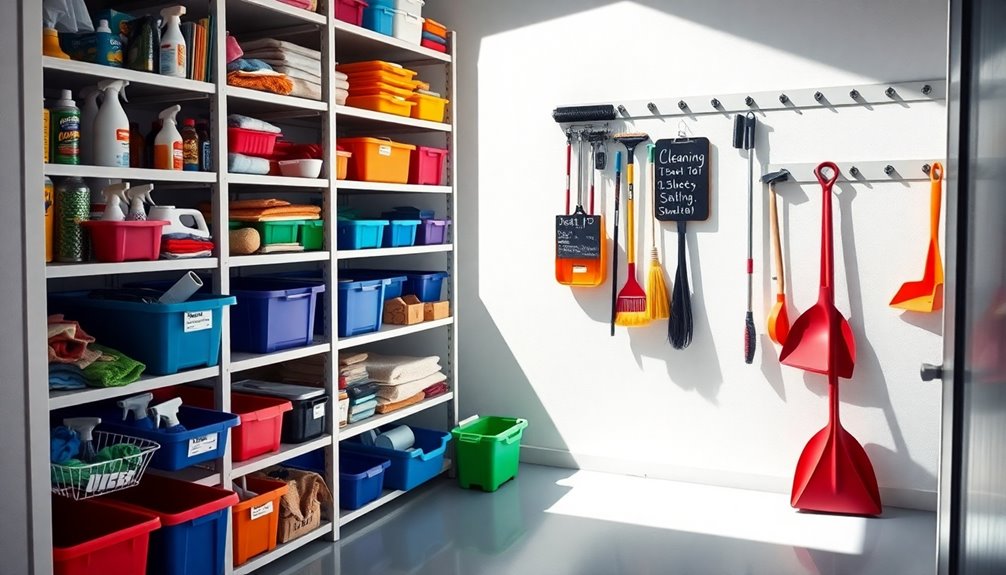
Choose clear or labeled bins for easy visibility, so you can quickly identify what you need without rummaging through clutter. Designate specific bins for different categories, like disinfectants, surface cleaners, or tools. This streamlining not only helps you find items faster but also instills a sense of order in your organized cleaning closet.
The installation of wall-mounted bins frees up valuable floor space, making your cleaning area feel more spacious. Remember to regularly assess and rearrange the contents of your bins to adapt to changing cleaning needs. This guarantees that frequently used items remain within easy reach.
Organize With Clear Bins
Cleaning closets can quickly become chaotic, but organizing with clear bins makes a world of difference. By using clear bins, you can easily see the contents without having to rummage through them, which greatly reduces the time spent searching for specific cleaning supplies. Additionally, implementing time-saving strategies can help streamline the process of maintaining your cleaning closet. Regularly assessing your bins and donating items not used in the last six months can also help keep your cleaning supplies relevant and manageable.
Opt for extra-large clear bins to accommodate larger bottles and containers, keeping your space organized and clutter-free.
For smaller items, consider using small bins with lids. These are perfect for height-limited storage, protecting your supplies while keeping them neatly tucked away. With everything in its place, you'll find that maintaining order becomes much easier.
Labeling your clear bins with simple, easy-to-read tags enhances your ability to identify the contents at a glance. This way, you can quickly locate the supplies you need without wasting time. Additionally, incorporating drawer dividers can further enhance your organization by segmenting smaller items for better arrangement.
Create a Cleaning Schedule
Getting organized with a cleaning schedule can transform how you maintain your home. Start by creating a customized cleaning schedule that outlines specific tasks for daily, weekly, monthly, quarterly, and yearly maintenance. This thorough approach guarantees that no area gets neglected. Establishing a routine enhances feelings of grounding and focus, making it easier to stick to your cleaning schedule.
Consider mounting your cleaning schedule inside the closet door for easy visibility. You'll promote regular adherence to your planned routines this way. Utilize dry-erase sheets, allowing you to easily update tasks or jot down notes about special cleaning supplies. This flexibility helps you adapt your schedule for seasonal cleaning or unexpected messes. Incorporating a designated time for a 10-minute tidy can further enhance your cleaning efficiency by addressing small messes promptly.
Incorporate reminders for regular inventory checks of your cleaning supplies. This practice prevents you from running out of essential products and helps you avoid duplicate purchases. Additionally, prioritizing high-traffic areas ensures that the most frequently used spaces remain clean and hygienic.
You might also want to involve all household members by assigning specific tasks on the schedule. This not only promotes accountability but also fosters teamwork, making maintaining a clean home a shared responsibility. Assigning age-appropriate tasks encourages participation and helps instill a sense of ownership in your family.
With a solid system in place, your cleaning schedule will streamline your efforts, making your cleaning routine more efficient and effective.
Designate Specific Storage Areas
An organized cleaning closet not only supports your cleaning schedule but also enhances your efficiency when tackling chores. To achieve this, you need to designate specific storage areas for your cleaning supplies. Group similar items together to make everything easily accessible.
Here's how to set it up:
- Assign Shelves: Place all floor cleaners on one shelf and bathroom supplies on another. This keeps everything neatly organized and easy to find. Additionally, keeping disinfecting supplies readily available is essential for maintaining hygiene in your home. Consider using adjustable dividers to create separate sections for each type of cleaner.
- Use Drawer Dividers: Create distinct sections for frequently used items, allowing for quick retrieval and minimizing clutter.
- Label Everything: Implement clear labeling on shelves and bins, ensuring each category of cleaning supplies has a designated space. This way, you'll know exactly where to find and return items after use.
Consider the frequency of use when designating storage areas. Place essential items like paper towels and everyday cleaners in the most accessible locations. Additionally, keep multi-purpose cleaners handy to reduce the number of supplies you need to store.
Maximize vertical space by keeping lightweight items on top shelves while heavier products stay at eye level. By following these steps, your cleaning closet will be an efficient, neatly organized hub for all your cleaning needs.
## Utilize Over-the-Door Solutions
To make the most of your cleaning closet, consider using over-the-door solutions that maximize vertical space.
These customizable racks are easy to install and can hold everything from spray bottles to microfiber cloths, keeping your supplies organized and accessible.
Maximize Vertical Space
Utilizing over-the-door storage solutions is a smart way to maximize vertical space in your cleaning closet. By taking advantage of the often-overlooked door area, you can free up valuable shelf space for other essential cleaning supplies.
These organizers can hold various cleaning products, tools, and accessories, making them easily accessible.
To get started, consider these three options for over-the-door storage:
- Racks: Install a rack to neatly store spray bottles and larger cleaning tools, maximizing vertical space efficiently.
- Baskets: Use customizable baskets to sort smaller items like sponges, brushes, and gloves, keeping everything organized and within reach.
- Hooks: Attach hooks for hanging brooms, mops, or even cleaning cloths, ensuring they don't take up precious floor or shelf space.
Customizable Storage Options
Incorporating customizable storage options into your cleaning closet can elevate your organization game even further. Over-the-door racks are a fantastic solution for optimizing vertical space, allowing you to store your cleaning supplies without sacrificing valuable floor area. These racks can hold everything from mops and brooms to cleaning solutions, markedly reducing clutter and enhancing overall organization.
What's great about over-the-door organizers is their flexibility. You can attach customizable baskets and hooks, tailoring the setup to fit your unique cleaning needs. This means you can designate specific spots for frequently used items like spray bottles and cloths, ensuring they're always within reach when you need them.
With this system in place, accessing your cleaning supplies becomes quick and efficient, making your cleaning tasks smoother. Plus, the installation process is a breeze, turning your closet into a functional space in just a few minutes.
Easy Installation Process
Installing over-the-door organizers is a straightforward process that anyone can tackle with just a few basic tools. You typically need adhesive hooks or brackets, which fit securely over the top of the door. This method allows you to maximize vertical space without any major renovations, keeping your cleaning supplies organized and accessible.
To get started, follow these simple steps:
- Choose Your Organizer: Select an over-the-door solution that fits your needs and door height. Consider racks with customizable baskets for tailored storage.
- Prepare the Door: Clear the area around the door and clean the surface to guarantee adhesion if you're using hooks.
- Install the Organizer: Place the brackets or hooks over the door, securing them according to the manufacturer's instructions. Confirm it's stable enough to hold heavier items, like brooms and mops.
This easy installation enhances accessibility by keeping frequently used cleaning supplies at eye level while reducing clutter on the floor.
With a little effort, you'll have an efficient cleaning closet that meets your individual needs.
Implement Efficient Hooks
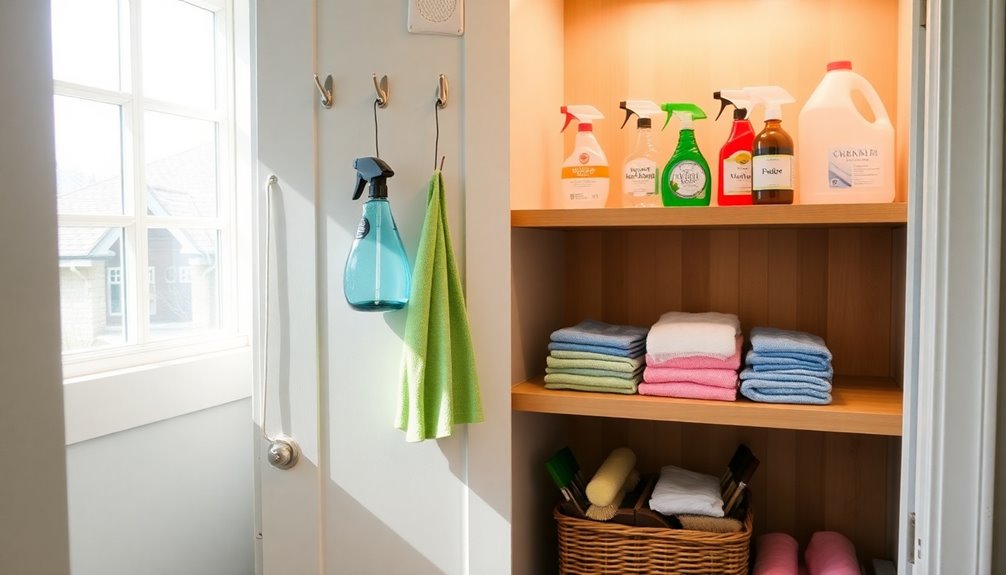
Efficient hooks can transform your cleaning closet from chaotic to organized in no time. Start by installing small coat hooks on the inside of the cleaning closet door. These hooks on the side are perfect for hanging frequently used cleaning tools, like dusters and rubber gloves, keeping them within easy reach.
To maximize space, use multiple rows of hooks, allowing you to store your cleaning supplies without cluttering the floor.
For larger items, opt for heavy-duty command hooks that can support brooms and mops. This way, you can maintain an organized storage solution without damaging your walls. If you prefer an even more secure option, consider using clamp-style racks to hang your brooms and mops. These racks accommodate different handle sizes while ensuring everything stays in place.
Don't forget to regularly assess the placement of your hooks. Adjusting their positions as necessary can help maintain an efficient layout that meets your cleaning needs and habits.
Store Tools for Easy Access
To make your cleaning tools easy to access, utilize vertical space effectively and label everything clearly.
Hang larger items on command hooks and store smaller tools in labeled bins to streamline your cleaning routine.
This way, you can quickly grab what you need without sifting through clutter.
Utilize Vertical Space Efficiently
While organizing your cleaning closet, think about how vertical space can transform your storage options. By utilizing the heights of your closet, you can maximize efficiency and keep your cleaning tools easily accessible.
Here are some effective strategies:
- Install over-the-door racks or hooks to store brooms, mops, and other cleaning tools vertically. This often-overlooked area can free up floor space and reduce clutter.
- Use spring-loaded holders designed for brooms and mops. These save space while securely keeping your tools in place, making them quick to grab when you need them.
- Hang narrow metal wall bins for spray bottles and cleaners. This optimizes vertical wall space, allowing you to keep supplies organized and visible, enhancing your overall organization.
In addition, consider multiple rows of small coat hooks for hanging dusters and brushes, improving accessibility.
Command hooks can also help hang heavier items like buckets without damaging walls, making it easy to adjust your layout as your needs change.
Label Everything Clearly**
One of the simplest ways to improve your cleaning closet's organization is by labeling everything clearly. Use clear, easy-to-read labels on all bins and shelves so you can quickly identify your cleaning supplies. This saves you time and frustration when searching for items during your cleaning routine.
Categorize your supplies by type or usage, like floor cleaners, disinfectants, and tools, then label each section accordingly. This way, you can access what you need without rummaging through clutter.
Consider implementing color-coded labels to visually distinguish between different product categories, which enhances both organization and retrieval speed.
Don't forget to regularly update labels as your inventory changes. This maintains clarity and guarantees every item has a designated spot in your cleaning closet.
Including labels on frequently used tools and supplies is essential; it allows for quick access, minimizing interruptions during your cleaning tasks.
Maintain Regular Inventory
Regularly evaluating your cleaning supplies is essential for maintaining an organized cleaning closet. Conducting a thorough inventory every few months helps you identify items that need replenishing or discarding due to expiration.
Here are three key steps to guarantee your inventory stays up-to-date:
- Create a List: Keep a written or digital list of your cleaning products. Note quantities and expiration dates to prevent duplicate purchases and maintain ideal stock levels.
- Designate Inventory Space: Implement a specific spot in your cleaning closet using clear bins or labels to categorize your supplies. This enhances visibility and access, making organization easier.
- Encourage Teamwork: Get all household members involved by encouraging them to report when supplies are running low. This fosters shared responsibility for keeping your cleaning closet well-stocked.
Protect Your Closet Floor
Maintaining an organized cleaning closet goes beyond inventory management; protecting the closet floor is equally important. By covering your closet floor with durable adhesive paper, you can prevent damage from spills and drips. This simple step makes cleanup easier and helps maintain the closet's appearance.
Plus, adhesive paper comes in various patterns, allowing you to add a touch of aesthetic appeal while safeguarding your floor from wear and tear. Opt for waterproof adhesive paper to protect against potential leaks from cleaning supplies, preserving the integrity of the flooring underneath.
Regularly changing the adhesive paper is also vital; it guarantees that any accumulated dirt or grime is removed efficiently, keeping your cleaning closet spotless.
Utilizing adhesive paper is a cost-effective solution that enhances the overall organization of your cleaning closet. It not only protects your floor but contributes to a more functional space.
Conclusion
By organizing your cleaning closet, you'll transform it into a powerhouse of efficiency. You'll find your supplies in a flash, making cleaning feel like a breeze rather than a chore. Remember to keep everything in its designated spot and maintain regular inventory, so you won't ever run out of essential items. With these simple steps, your cleaning routine will be so streamlined, you'll feel like a superhero zipping through chores in record time!